After posting a new blog post, you want to share it on social media, and it is often a good idea to share it in your next newsletter as well.
Some of you might like to have each new blog post sent out automatically to your newsletter list, and that is where MailChimp’s RSS campaign feature comes in.
MailChimp’s instructions are right here: Create an RSS Campaign, but I’ll run through some instructions for you here, anyway.
Step 1
Log in to your MailChimp account, find your Dashboard if you aren’t already there. Click on ‘Create Campaign’ on the top right of the page. You will be able to choose which list to send to later in the process.
Step 2
Select ‘RSS campaign’ from the list of campaign types.
Step 3
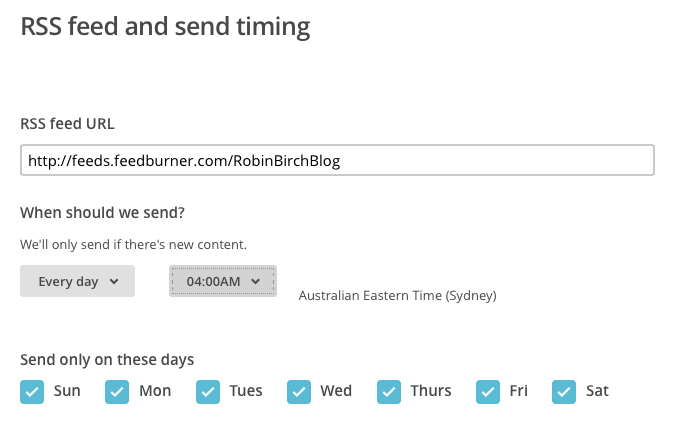
Find your Blog’s RSS feed URL, and copy and paste it into the field provided. My feed’s URL, for example, is http://feeds.feedburner.com/RobinBirchBlog

Set your sending day and time settings – one suggestion is to set them to ‘Every day’ and choose a time that is in the early hours for yourself, such as 4 am – this gives you a chance to look at your published post and fix up any problems before you go to bed, and this will be before your subscribers get the email (unless you work all night, that is, lol).
Alternatively, choose a time and days that best suits the majority of your audience, such as early mornings on week days (if like me you live in a vastly different time zone from the majority of your readers, this involves some calculation).
Mailchimp will only send out the emails when you have published a new blog post, setting to send all days makes sure the email will go out within 24 hours of you posting.
Step 4
Click Next, on bottom right of page. On the next page choose which list you want the emails to go to – you can only choose one list. If you want to send to more lists, you could set up an RSS campaign for each list.
Step 5
Hit Next and fill in your Campaign information.
Step 6
Next you will find the ‘Select a template’ page. It’s easiest to choose a template pre-made for RSS campaigns, look through the templates on the ‘Basic’ page and on the ‘Themes’ page. For example, there is one called ‘Basic RSS’ on the Basic page, I’ll choose that one for this article.
Step 7
You may want to edit your template. Upload a header image if you want one, or delete the photo block by hovering over it and clicking the bin icon.
The rest of the template will be unintelligible, but you can soon make sense of it by going to ‘Preview and Test’ on the top right, then ‘Enter preview mode’.

You might like to add something else such as a text box where you write some information about yourself, your services, and so on, which will appear on all the emails, for every new blog post – drag the text box into your template (before or after your RSS content) and click the edit button, the editor appears on the right side of the page. Put in your material, click Save & Close and preview your creation. Close the preview and move your blocks around if you need to.
At the very top of your template is a small header, you will need to edit the text on the left, you can write something like “New blog post”, or just delete the existing text.
You can send yourself a test email if you like, it’s fun! This is also found under Preview & Test.
Step 8
Next review your campaign, and if all is good, hit ‘Start RSS’. Your campaign is now launched!
From now on, every time you publish a blog post, whether it is once a day or once in a blue moon, an email featuring it will automatically go out to your subscribers at the time of day you specified, when it next occurs. Awesome! Of course you can still send regular campaigns (newsletters) to the same list any time you like.
Other email services also provide RSS campaigns, find them by doing a search for “rss to email” along with the name of your email service.
Cheers – Robin
